<|begin_of_text|>
You step off the trail and raise your binoculars. A bird is perched on a sagebrush branch. It does not match any field guide page you have memorized. Your heart beats a little faster. You know this sighting could matter. But if you do not document it correctly, the record may never get accepted. That is where this guide comes in. Whether you use eBird, iNaturalist, or a state rare bird committee, the way you document rare bird sighting citizen science contributions makes the difference between a confirmed record and a footnote.
Proper documentation of a rare bird has four parts. Capture clear evidence like photos or audio. Write detailed notes on field marks, habitat, and behavior. Submit to the right platform such as eBird or iNaturalist. Follow up if reviewers ask for more details. These steps ensure your sighting becomes usable data for science.
Why Your Record Matters More Than You Think
Citizen science databases rely on people like you. When you document rare bird sighting citizen science records, you help researchers track migration shifts, climate impacts, and population changes. A single well documented sighting can trigger a conservation review or update a species range map. In 2026, the Cornell Lab of Ornithology showed that eBird participants contributed over 150 million observations in the past year alone. But not all records are equal. The ones with strong documentation get flagged as “reviewable” and end up in peer reviewed studies.
Think of it this way. Your sighting is a data point. The more detail you add, the more weight that point carries.
What Counts as a Rare Bird?
Before you start documenting, check whether your sighting qualifies as rare. Different platforms have different thresholds.
- eBird uses a “review list” for each county or region. If your bird is on that list, the system flags it for expert review.
- iNaturalist relies on community agreement. A rare species may get “research grade” status once multiple users confirm the ID.
- State or local rare bird committees often have their own criteria, usually based on frequency and historical records.
If you are unsure, submit anyway. Let the reviewers decide. But do your homework first. A quick look at What Makes a Bird ‘Rare’ in Western North America can help you understand the thresholds.
The Core Documentation Process
Here is the step by step workflow for building a bulletproof record.
- Observe and take notes immediately. Do not trust your memory. Write down everything while the bird is still in view.
- Capture evidence. Photos, video, or audio recordings are gold. Even a blurry photo helps if it shows a key field mark.
- Describe the bird in detail. Use a structured approach so you do not miss anything.
- Eliminate similar species. Explain why it is not the look alike that is common in your area.
- Note the habitat and conditions. Date, time, weather, location coordinates, your optics, lighting, and distance.
- Submit to the appropriate platform. Choose the right one for your region and audience.
- Respond to reviewer questions. The conversation is part of the process.
Let’s break each one down.
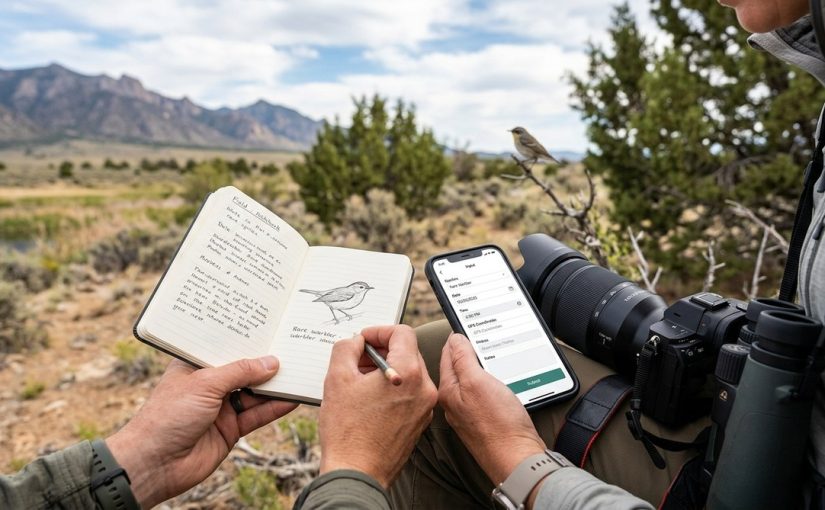
Step 1: Write Field Notes While the Bird Is Still There
Pull out your phone or a notepad. Record the date and exact time. Use a GPS app to get coordinates. Describe what you see from the top of the head down to the tail. Include:
- Overall size and shape relative to familiar birds (sparrow sized, robin sized, crow sized)
- Bill shape, length, and color
- Eye color, eye ring, and facial pattern
- Wing bars, tail pattern, and rump color
- Leg color and length
- Behavior: foraging style, flight pattern, tail bobbing, wing flicking
- Vocalizations: describe them in words or record them
A good habit is to sketch the bird. You do not need artistic talent. Simple shapes and arrows pointing to features work fine. Sketching forces you to look carefully.
Step 2: Capture Evidence With What You Have
You do not need a $2,000 camera. Your phone through a spotting scope (phone scoping) can produce usable images. Audio recordings from a voice memo app can capture calls that clinch an ID later.
For photographers, aim for multiple angles. A front view, a side view, and a shot showing the bird in flight are ideal. If you only get one frame, make it count. Focus on the head and bill.
For audio, record at least 15 to 30 seconds of continuous vocalization. Note whether the bird was singing, calling, or giving an alarm note.
Step 3: Write a Full Description
Once the bird leaves, expand your notes into a coherent description. Organize it by body part. Use the same format that reviewers expect.
Sample description for a hypothetical rarity:
“A small thrush about the size of a Hermit Thrush. The upperparts were warm olive brown. The underparts were pale with distinct dark spots on the breast. The eye ring was bold and white. The tail showed a rusty tone when it flicked upward. The bird foraged on the ground, flipping leaves with its bill. It gave a soft ‘chuck’ call twice.”
This level of detail tells reviewers you saw the bird well.
Step 4: Rule Out Similar Species
This is the most important part of your documentation. List the common species that look like your bird and explain why they do not match.
For example, if you think you saw a Rufous-backed Robin in California, you need to explain why it was not an American Robin with unusual lighting. Compare specific field marks.
Common mistake: Saying “it was too big to be a sparrow” without giving measurements or comparisons.
Be specific. Use numbers where possible.
Step 5: Record Habitat and Conditions
Reviewers want to know the context. Include:
- Habitat type (coastal scrub, pinyon juniper woodland, suburban park, etc.)
- Weather conditions (overcast, bright sun, fog, rain)
- Distance to the bird (estimated in feet or meters)
- Optics used (binocular magnification, camera lens)
- Length of observation (how many minutes or seconds)
- Number of observers and their experience level
If you were with other birders, note their names. A record backed by multiple experienced observers carries more weight.
| Documentation Element | Best Practice | Common Mistake |
|---|---|---|
| Photos | Show the bird from multiple angles | Only one blurry shot |
| Field notes | Written during observation | Written from memory hours later |
| Similar species elimination | List each species and why it was ruled out | “It didn’t look like anything else” |
| Habitat description | Use specific habitat terms | “Some trees near water” |
| Location | GPS coordinates or precise map pin | “Near the lake” |
| Time and date | Record immediately | Guess the date later |
Which Platform Should You Use?
You have choices. Each platform serves a different purpose.
eBird is the standard for bird specific citizen science. It feeds data to researchers, conservation groups, and the public. When you document rare bird sighting citizen science records on eBird, your submission goes through a review process. If accepted, it joins a global dataset used in hundreds of scientific papers each year.
iNaturalist is broader. It covers all living things. Bird records on iNaturalist get verified by the community. Many birders use both platforms. They put checklists on eBird and photos on iNaturalist.
State rare bird committees handle the most extreme rarities. If you find a bird that has never been recorded in your state, the committee will review your documentation. Their standards are higher. They often require written narratives, photos, and sometimes a video.
For day to day use, start with eBird. If you have strong photo evidence, also post to iNaturalist.
Common Mistakes That Get Records Rejected
Reviewers see the same errors again and again. Avoid these.
- Vague descriptions. “It was brown with a white belly” does not help. Every sparrow fits that description.
- No photos or audio. In 2026, most reviewers expect at least a photo for a true rarity. If you could not get one, your notes must be exceptional.
- Ignoring common look alikes. Reviewers want to see that you considered the expected species.
- Wrong location data. A dropped pin on a map is better than a place name. “Southeast corner of Willow Lake, near the boat ramp” is precise. “At the lake” is not.
- Exaggerating the rarity. Do not say “definitely a Siberian Accentor” if you only saw it for two seconds in bad light. Be honest about uncertainty.
Good documentation is honest documentation.
The Art of Taking Better Field Notes
Field notes are the backbone of your submission. They are what reviewers read when photos are not available. Here is how to make yours stand out.
Start with a header that includes date, time, location, and weather. Then write a narrative that flows from first impression to final identification.
“At 7:45 AM on April 12, 2026, I was birding the Willamette River Trail near Eugene, Oregon. Light was overcast with occasional sun breaks. I saw a medium sized passerine perched on a willow branch about 20 feet away. My first impression was ‘warbler’ but the bill looked thicker than a typical warbler. I watched it for about four minutes through 8×42 binoculars. The bird was actively gleaning insects from leaf surfaces. It did not sing. The wing bars were bright yellow, and the throat was white with a faint yellow wash on the breast. I ruled out Yellow Warbler because the underparts were not fully yellow. I ruled out Wilson’s Warbler because there was no dark cap. The closest match was a female Black throated Green Warbler, which would be a good bird for this location in April.”
This narrative tells the story of your identification. It shows your thinking. That is what reviewers want.
Using Technology to Strengthen Your Record
Smartphones have changed documentation. Use these tools in the field.
- Merlin Bird ID can identify birds from a sound recording. Run it while the bird is calling.
- eBird Mobile lets you enter a checklist on the spot. No need to wait until you get home.
- Google Maps or Gaia GPS can drop a pin at your exact location.
- Voice memos capture your immediate impressions. Speak your notes aloud while watching the bird.
But do not let the phone distract you from watching the bird. Technology is a tool, not a substitute for careful observation.
“A photo is worth a thousand words, but a sketch with arrows pointing to the diagnostic field marks is worth a thousand photos if you cannot get a shot.” — Pete Dunne, veteran birder and author
What Happens After You Submit
When you submit a rare bird record to eBird, it enters a queue. A regional reviewer, usually a volunteer with strong local knowledge, looks at your submission. They may accept it, flag it as “unconfirmed,” or write back with questions.
Do not take rejection personally. Reviewers are cautious by design. A single misidentified record can skew data for years. If they ask for more details, respond quickly and politely. Provide additional notes or photos if you have them.
On iNaturalist, the community votes on your ID. If enough people agree, your observation reaches “research grade” status. That status means the data can be used in scientific studies.
For rare bird committees, the process is slower. They meet a few times per year. Do not expect an immediate answer.
Building Your Reputation as a Reliable Observer
Over time, reviewers learn which observers submit careful work. If you consistently document well, your future rare bird sighting citizen science contributions will be trusted faster. That trust does not come from being right every time. It comes from being honest, thorough, and responsive.
Learn from every submission. If a reviewer questions your ID, study the feedback. It will make you a better birder.
Your Field Kit for Rare Bird Encounters
You cannot document what you cannot capture. Keep these items in your birding bag.
- A small notebook and a pen that works in wet weather
- A phone with eBird and Merlin installed
- A portable power bank to keep devices charged
- A compact camera with a zoom lens, if you have one
- A voice recorder app ready to go
- A GPS device or phone with offline maps
Being prepared means you can document rare bird sighting citizen science records even when the encounter is brief. As covered in Building a Field Ornithology Kit: What Professional Bird Researchers Actually Carry, the best gear is the gear you actually have with you when the bird appears.
A Checklist for Your Next Sighting
Print this or save it to your phone. Use it in the field.
- [ ] Date and time recorded
- [ ] GPS coordinates taken
- [ ] Photos or audio captured
- [ ] Size comparison noted (sparrow, robin, crow, etc.)
- [ ] Bill shape and color described
- [ ] Eye, face, and head pattern recorded
- [ ] Wing and tail details noted
- [ ] Underparts color and pattern described
- [ ] Leg color noted
- [ ] Behavior observed (foraging, flying, calling, resting)
- [ ] Similar species eliminated with reasons
- [ ] Habitat described in detail
- [ ] Distance, lighting, and optics noted
- [ ] Submitted to the appropriate platform
- [ ] Followed up with reviewer questions
Wrapping Up Your Record
Documenting a rare bird is not just about getting your name in a database. It is about contributing to a larger understanding of the natural world. Every well documented record helps scientists see patterns that would otherwise remain hidden. It helps conservationists protect the places that matter most. And it helps other birders know what is out there.
The next time you see a bird that makes you stop and stare, you will know exactly what to do. Observe. Note. Capture. Submit. Your record could be the one that changes how we understand a species. Make it count.
For more on the species that might show up on your next outing, check out 5 Unexpected Vagrant Species That Showed Up in California This Year. And if you want to stay ahead of the latest arrivals, Rare Bird Alerts: Which Apps and Resources Actually Work Best can help you plan your next chase.